You have many choices among photo editing software programs, whether it’s Adobe Photoshop, Corel Painter, Paintshop Pro, GIMP.net, and more—all of which now have very similar feature sets. These basic photo editing tips will help you work in pretty much any application available.
Working with layers in photo editing
The “magic” of Photoshop and its clones is the Layers feature. It’s analogous to color separations, where each of the four colors (cyan, magenta, yellow, and black) in the four-color process are printed on separate plates, then printed on top of each other to create a full-color image. Each “CMYK plate” is a layer in the four-color process.
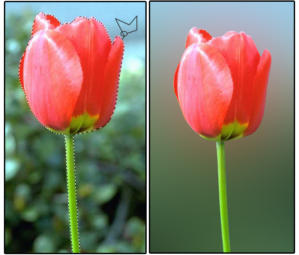
When you open a photograph in Photoshop, it has only one layer, the background layer, and it’s called a flattened image. If you use the Lasso tool to outline one tulip in a field of many flowers, then cut and paste that tulip back into that same photo, Photoshop pastes it in as a new layer, displays it in the Layers palette, and names it Layer 1. Right-click this box, choose Layer Properties, and enter a new name for this layer.
Each time you cut and paste a flower from the photo’s field of flowers, Photoshop creates a new layer so you can edit, recolor, reshape, resize, add a filter such as Watercolor, or a style from the Styles palette, or a dozen other features. Only the “selected” layer is affected. This way, you can use different effects and filters on each separate layer–and a mistake on one layer doesn’t affect the other layers.
Why you should keep your original intact
The number one, most important tip I can share with you is this: Never edit your originals. Always make a copy and save that copy as a layered file, if possible, because layers can be adjusted and edited individually.
The best layered formats are PSD (Photoshop) and TIFF (Tagged Image File Format). All the popular photo editing programs will either Save As or Export to one of these two formats.
Why not save images as JPGs? Because JPG is a “lossy” format, which means the image is compressed, which creates smaller file sizes (to accommodate applications with limited resources such as email and cell phones). Each time it’s re-saved, the image quality degrades a bit, and it does not support layers.
The remaining image formats, such as BMP, GIF, PHG, EPS and more, are not suitable “working” formats. In other words, they are not appropriate for editing images.
NOTE: RAW and DNG are in a whole different class of formats, generally used by professional photographers and not supported by all phones, cameras, or programs.
Resize photos without losing image quality
Resizing down—or making images smaller—is no problem. It’s resizing up that ruins everything. When you try to make images larger, the pixels explode and create fuzzy halos around everything. This is called photo compression noise or pixelation.
To avoid this, never enlarge without adjusting the pixels to compensate. For example, if you have a 4×5-inch photo that’s 600 pixels per inch (or 2400×3000 pixels), you can enlarge the photo to 8×10 if you reduce the pixels per inch to 300 (note the pixels are still 2400×3000) and lose no image quality. If you enlarge to 8×10 and leave the ppi at 600, the image will blur slightly and continue to do so each time you attempt to resize larger without reducing the ppi.
It’s important to distinguish resizing from a feature you’ll find in Adobe Photoshop (and some of the other editing programs) called “resampling.”
The paragraph above is an example of Resizing; that is, the number of pixels in the image do not change and; therefore, the image quality remains intact. Resampling changes the image by adding more pixels (upsampling) or subtracting pixels (downsampling), which means adding or deleting information and detail from your image. Unfortunately this is not a precise process, which is why Photoshop provides three Resampling options: Bicubic, Bilinear, or Nearest Neighbor. There is no “right way” or “correct answer” to this process. All you can do is experiment and save the image with the best results.
How to remove busy backgrounds
Editing out unwanted background imagery is always a challenge. You can use the Polygonal Lasso tool to select the object in the foreground, then invert the image to make the background the active layer, then press the Delete key. Or you can cut-and-paste the image onto a new layer and choose a special effect to fill the background, such as Gaussian Blur or Motion Blur, or choose a nice filter.
Another option is to use the Pen Tool to outline the object and create a Clipping Path. Once the object is completely outlined, press and hold the Ctrl key, and simultaneously click the Vector Mask on the Layers palette. The marquee surrounds the selected area. Move your cursor to the background layer, invert the image, then press the Delete key. Both options produce the same results and both are fairly easy to perform, so it’s just a matter of personal preference.
You can also use the Magic Wand for images with distinct light and dark areas. This can be tricky and often selects areas you don’t want selected. But you can use it for the large areas, then fine-tune with the Lasso.
How to use the Clone Stamp to smooth and polish surfaces
The Clone Stamp tool, not to be confused with the Blur or Smudge tool, is all about the right brush style, brush size, and brush location. The brush should be smaller than the eraser head of a pencil (size 40 for an 8×10, 300 ppi photo is good), round, and slightly blurred. The location should be as close to the stamped area as possible.
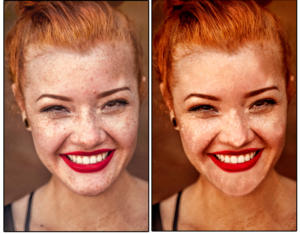
Position the brush on the surface you want to clone (such as a smooth, blemish-free part of the face). Press the Alt key and click the mouse once. Move the tool over a blemished area and click again. The blemish disappears.
If you want it to look natural and consistent, you must stamp the tool in a clean area directly above, below, or beside the blemish. Otherwise the skin tones fluctuate too much, and the results begin to look “stamped and blotchy.” Our sample removes the blemishes and freckles only, but it still needs an Image Adjustment feature such as Skin Smoothing to blend the cloned areas more evenly.
How to salvage blurry, out-of-focus pictures
For this process, you can use a Sharpen / Sharpen More filter, but note that each time you use it, the image gets grainier and begins to resemble sandpaper. That’s not necessarily a bad thing, if you like “artistic” photos. Most programs even provide several “Grain” filters as part of the Special Effects package.
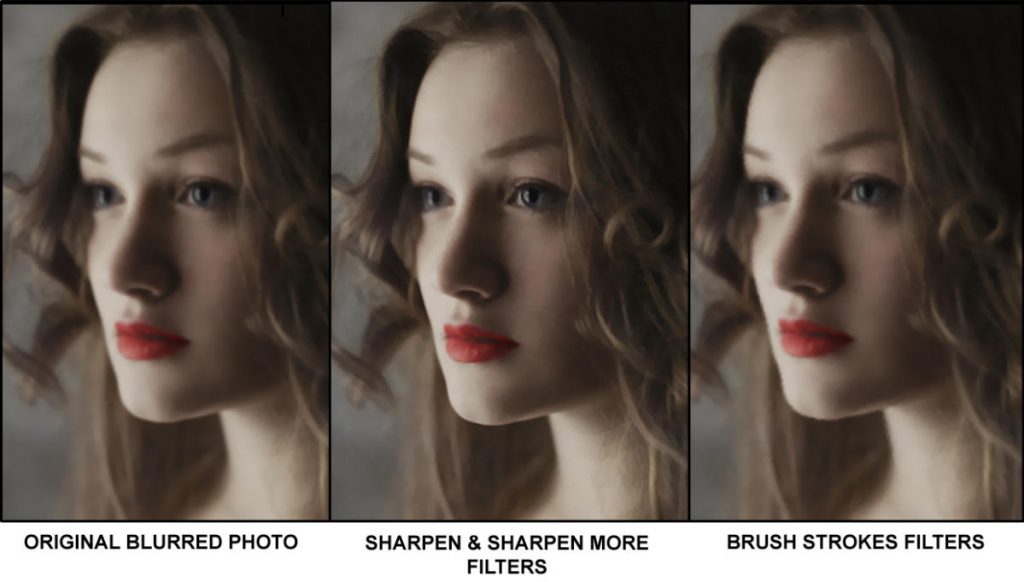
You can also use one of the many Artistic, Brush Stroke, or Stylize filters, which make the photo look like a painting. Based on how much out of focus the original image is, and how much you really want to keep that particular picture, a “painted” filter can actually enhance the original photo.
Learn more through exploring and doing
Beyond these basic tips, learning more about photo editing is as easy as exploring and playing around with your software. For example, ever notice that border of purple light around the objects in your pictures? It’s called Purple Fringe, and it’s now easily corrected. Chromatic Aberration Removal (caused by distortion of the lens), Backlighting, and a host of distortion corrections such as Barrel, Fisheye, Depth of Field, and Pin Cushion are all now easily repaired. Explore your photo editing program of choice to find the features to correct these flaws.
Note: When you purchase something after clicking links in our articles, we may earn a small commission. Read our affiliate link policy for more details.
JD Sartain is a technology journalist from Boston. She writes the Max Productivity column for PCWorld, a monthly column for CIO, and regular feature articles for Network World.
This article is writtenBy JD Sartain Dove and appeared here.
All the images are collected from here.