
A sure-fire way to enhance your headshot is by touching up any under eye bags or dark circles. Photoshop’s got just the tool to do it.

Headshot photography is crucial when it comes to really making your client shine. Whether it’s a social media profile image or a marketing campaign, your client will want to look their best, and headshots are the classic go-to shot for these purposes. But there’s more to showing off a great headshot than just clicking the shutter.
I previously shared some tips and tricks on creating awesome headshots , but I want to take a closer look at one particular post-processing detail. The eyes. Specifically, how to remove the dark circles under your models eyes.
SEE: Choosing your Windows 7 exit strategy: Four options (TechRepublic Premium)
Here’s how I complete this tasks for my clients using Photoshop.
Let’s face it, even when there’s makeup involved, there’s still still a strong chance of the model having dark circles or eye bags under his/her eyes. Unless you’re going for a weathered or exhausted look, this isn’t ideal. (Even someone as handsome as myself has dark circles under my eyes. Not because I’m exhausted, but due to genetics.) Even a light that’s not properly placed will cast shadows onto your model’s face creating this undesirable look. Fortunately, the fix in post is pretty easy with Photoshop and the gradient tool.
Utilizing Photoshop
- First, open your image with Photoshop.
- Click on the “background” layer in the layer panel to remove the lock on the layer.
- Next, click the new layer icon to add a new empty layer above your background layer. (You won’t see anything change on the screen at this point because the layer is empty.) (Figure A)
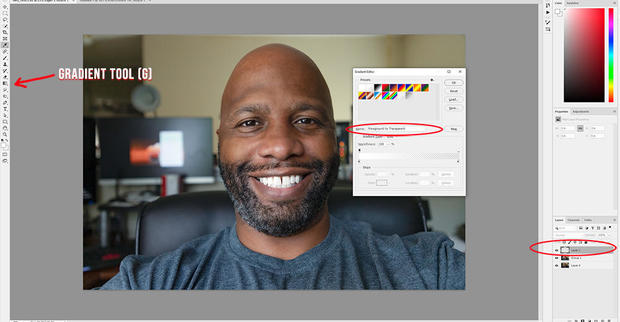
Figure A
Ant Pruitt

- With the new layer highlighted, click on the Gradient tool (Figure B) in your tool bar or just press “g” on your keyboard.
- In the upper left corner, click on the gradient icon, making sure the gradient type is the “foreground to transparent” setting. (When using the gradient tool, we’ll only work with one color during each stroke.)
- Click ok to get back to your main view and then select the radial gradient tool on the upper left. This will be useful because each gradient stroke will create a circle based on the color you select. Trust me on this, it will make sense momentarily.
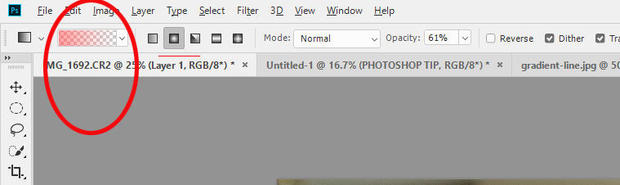
Figure B
Ant Pruitt

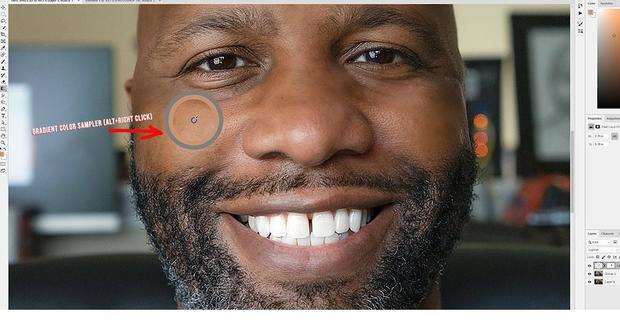
Now that your tool is ready, let’s sample the color next to the dark areas on the model’s eyes. We’re selecting this color because this is the tone that will be used to blend into the dark areas underneath the eyes.
- To sample the color, hold your ALT key (option on MacOS) and click the color next to the dark area. This sample will be a solid color, but it will fade as you click and drag.
- After your color is sampled, click and hold just under the dark area then drag your cursor to the top of the dark areas of the eye bags.
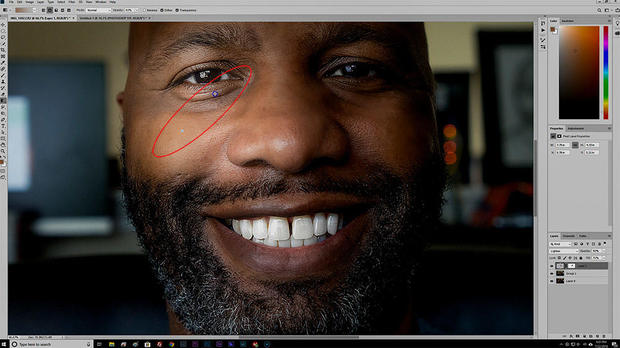
You’ll notice the color will begin to blend on top of the darkened areas of the eyes. Fine tune this action by sampling color tones from other sections near by and dragging again to create a small gradient circle (Figure C). The further you drag your cursor, the larger the gradient circle will be and vice versa.

Ant Pruitt
As you create the new strokes on the dark areas, you may find that your gradients are too large. Don’t worry, you can fix that. Trust the process.
Continue to find a good match with your color tones by adjusting the opacity and fill of your layer. You’ll notice that decreasing the opacity and fill to less than 100% will help blend the colors (Figure D). Depending on the skin tone, sometimes changing the layer’s blend mode to lighten or soft light is useful. Your mileage may vary. Just experiment
Figure D
Ant Pruitt
- Finish off the task by adding a layer mask to the layer.
- Press “b” on your keyboard to activate your brush tool.
- With the layer mask selected, use a soft brush with black paint selected.
- Brush away the excess color gradient, which will reveal the underlying layer.
- This works best with light pressure brush strokes with a Wacom tablet , or just adjust the brush opacity to roughly 30%. The final product will look much better.
Now you have a finished product, and the dark circles under the eyes have been removed and give a much more flattering and natural appearance. Even me (Figure E).
Ant Pruitt

I hope this tip has been helpful for you. Have any Photoshop tips you’d like to share? Tag me on Twitter with your favorite tips. Let’s spread as much knowledge as we can for our fellow photographers and content creators.
This article is written by Ant Pruitt and appeared here.
All the images are collected from here.