
Welcome to this step by step tutorial on how to watermark your images. Today I want to show you how to create a watermark using your name or logo in Photoshop. Additionally you can save a watermark and reuse it and drag it into other images later on.
I will explain why you would want a watermark on your photo first. One of the main reasons is to help protect your photos from being stolen.
If you are a commercial photographer or if you’re starting out in photography or post images on your social media pages and on your blog then you need to add watermark on your images. If there’s no watermark on your images then a lot of people might be tempted to just download it right away and share it without giving you any credit. So it’s very important that you use your company’s logo or your name as a watermark across the photo so your photos are safe. In this way people can see your photos but cannot use them without your permission. If they need it they want to buy the one without the watermark on it. Watermarking is great for this purpose.
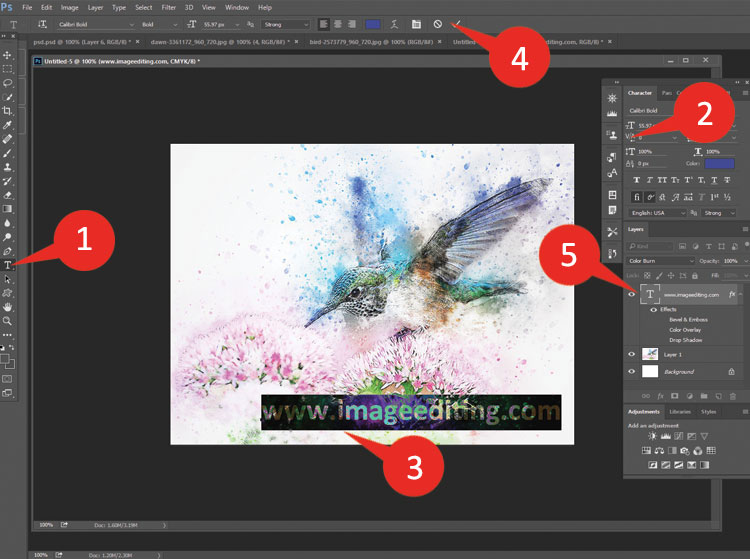
- So first let’s take a image and select the Text Tool on Photoshop The shortcut for text tool is T on keyboard.
- Let’s choose Arial as the font and make it bold from the Options bar.
- Click in the image and then type Imageediting.com. You can use your name or your company’s name.
- Select the Commit button at the top.
- Double-click the type layer to open the Layer Style dialog box. You can do the same by selecting Layer-Layer style -Bevel and Emboss. This brings up the new panel Bevel and Emboss.
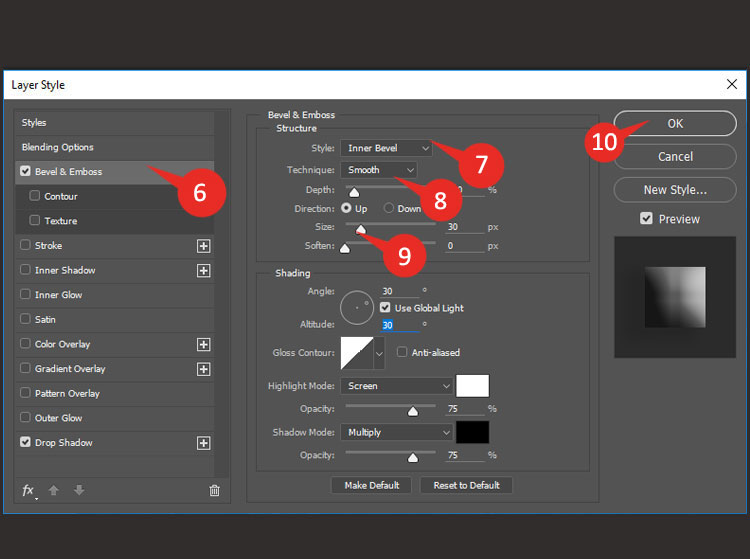
- Select the uncheck Bevel and Emboss box.
- Select Inner Bevel by clicking on the Style drop-down menu.
- From Technique drop-down menu, we have Chisel hard effect, Chisel soft effect but we will select the smooth effect for our purpose.
- To increase the effects drag the Size slider.
- Select OK.
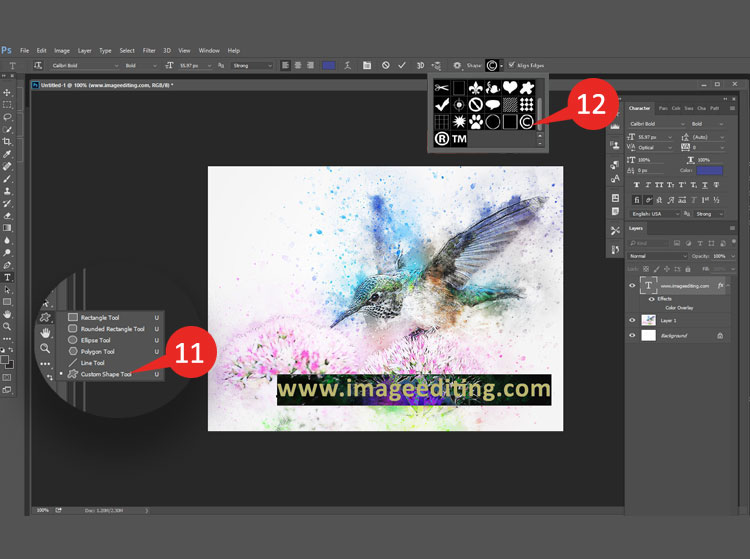
- Select and hold the Rectangle tool and select the Custom Shape tool.
- Next click the Shape drop down menu and select the copyright symbol.
- Press Shift and click and drag in the photo to create a copyright symbol.
- The copyright symbol appears on the image and as a shape layer in the Layers panel.
- Press Alt for Window or Option for Mac and click and drag the Layer Style button from the type layer to the shape layer to copy the effect. The same emboss style is applied to the copyright symbol.
- Drag down the value of Fill to 0.This minimizes the content of the text to invisible.
- Click the type layer to select it and repeat step 15. The name and copyright symbol appear embossed on the image.
The Layers panel includes two types of sliders. The Opacity slider affects the visibility of both the filled pixels and the layer style. The Fill slider affects only the transparency of the filled pixels without changing any style that is applied.
As the effect looks strong so you can reduce the opacity of that effect. This makes it very much more subtle and if you zoom out now you can see that the watermark is a lot more subtle. But if it feel too strong still then the great thing is that with the bevel and emboss effect you can double click it and you can go back into the effects and can manipulate the settings of the depth and the size of the emboss. Then adjust the adjustment just to soften that down a little bit or change it slightly.
Also decrease the amount of highlight and decrease the amount of shadow. Just bring that one back up a little bit. Again by using the opacity adjustment on here you can minimize that down as it’s almost invisible. So now you can see it and no matter where you put it over the image whether it goes over light areas or dark areas because of the bevel and emboss having highlights and shadows on either side your copyright watermark is visible no matter where it gets placed on the image. Finally you can drag it around and decide where you want to put it on the image. You can actually duplicate your layer and if you want to put more than one mark. You can put an extra one over your image. You can even resize them. Just go into edit transform scale and then select the one you want to resize and put smaller watermarks on there as well. You can duplicate those and you can move them around so you’ve got all this ability.
Save this image file with several of these watermarks that you’ve created and keep a collection of them in one image file and save that image file as watermarks. then whenever you need to watermark a new image all you simply need to do is open another image and now if you wanted to get a watermark in there without having to go to all that hassle all you need to do is go into this image and drag that layer into there. There’s your watermark ready to go in the other image very quickly and very simply.
This is how you can create your own custom watermark on your image. If you have bulk images to place your watermark on you can contact us here. We are ISO Certified Company and our client satisfaction is our personal responsibility.
Related Articles:
How to add a watermark to an Image in Photoshop
How to add a watermark to your photos using Lightroom
How to Watermark Your Images Using Lightroom and Photoshop CC