If you’ve ever dreamed of creating high-quality commercial images like Joel Grimes, Erik Almås, Tim Tadder or Alexia Sinclair then you may also know how much they rely on post-production in photoshop to bring those images to life. I know Photoshop can be overwhelming at times, especially if you’re just starting out, which is why I’m going to walk you through one of my composites in 5 easy steps to get you on your way to creating amazing images!

Step One: Organize your layers

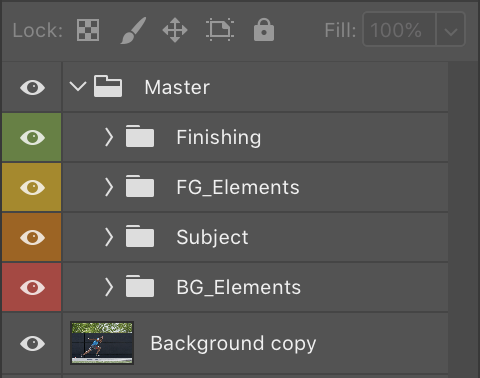
When doing a composite, photoshop can get messy real fast. With multiple background, foreground, adjustment layers, and clipping masks all over the place it’s a good idea to have them all organized. Before I start each of my composites I create a folder structure for my layers in Photoshop .
- Finishing – Contains all the final touches such as Color grading, Sharpening, Dodge & Burn etc.
- FG_Elements – Holds any foreground elements such as light flares, or smoke that may interact with the main subject .
- Subject – Holds the layer of the main subject in the composite.
- BG_Elements – Holds all my background layers and adjustment layers that only need to affect the background layers.
You can save time and automate this task by creating an action that will create all the folders for you in the blink of an eye. I’ve also color-coded each folder group so that I can locate the exact layer that I need to work on quickly, even if there are 50+ layers!
Step Two: Remove your Subject from the Background

This is the foundation of your composite. Your ability to cut your subject cleanly out of the background can make or break your composite. There are many ways to do this procedure in Photoshop however my preferred method is to use a fairly new feature that is available in the most recent edition of Photoshop. Select the layer with your subject and up in the menu go to Select > Select Subject. Photoshop will work its magic and make a selection of your subject for you. However this selection isn’t always perfect, and this is where you will need to use the Lasso tool by hitting L on the keyboard to manually adjust the selection. When using the Lasso tool, holding the shift key will add to the current selection. Holding the option (alt) key will subtract from the current selection.
Cleaning up the selection Photoshop made for you is usually the most time-consuming part of the composite. While there are other tools that can be used in this step, like the Pen tool, I find that for me, that Lasso tool when used with my Wacom Tablet allows me to be very quick and efficient at this step. With that said, it still takes me on average ~30 mins to get a super clean selection that I’m happy with.
Once your selection is made the final part to this step is to go to Select > Select & Mask. In the dialog box you can adjust the Global Refinements settings to suit your needs however the more important step here is in the Output Settings. Ensure that ‘Output To’ is set to ‘New Layer with Layer Mask’ and click Ok.
Step Three: Add a new Background
Now that your subject is removed from the background, move the new layer to your Subject Folder. At this step, you can now add a new background! It’s important to note a few things, however.
- Make sure that the perspective of your background matches or is similar to the perspective of your subject.
- Ensure that the light in the background image compliments the lighting that is on your subject.
If these steps are followed correctly, your composite will have a feeling of harmony and look more believable which is the goal in good compositions! I also like to add subtle flares and other effects in my FG_Elements folder at this stage. The addition of these elements often seems to physically interact with the Subject which adds to the overall believability of the composite.
Step Four: Add the Finishing Touches

Now you have all the meat to this sandwich of a composite you can now finish it off with a few layers on top, literally! In the Finishing folder, the first thing that I always do is add a Selective Color Adjustment layer. I use this adjustment to globally adjust the colors of all the layers beneath. Next, I usually run a High-Pass Filter effect to give the final image a little bit of extra punch!
Step Five: Save & Quit
Now at this point, the photoshop document may be really big, so big that saving it as a normal .psd file may not work! The limit for .psd files is 2GB and my composites are usually 2GB or bigger so as a precaution I always save my files as .psb (Large Document Format). In the Save As dialog box select Large Document Format from the drop-down list.
Now I know there are a few steps and techniques that could use a little more explaining like my Color Grading in step 4 but I think you now have the basic steps to get you started. While there are infinite ways to do one task in Photoshop these days, this is the template that I’ve had the most success with however if you have questions or on suggestions about this process I’d love to hear them so let’s continue the discussions in the comments below!

This article is written by Guest Contributor and appeared here.
All the images are collected from here.
